Release 2.7.0
Release Notes
We’re excited to announce the release of version 2.7.0!
This update introduces Role-Based Access Control (RBAC), upgrades the platform to the latest Node.js version, and adds encryption for Oscilar responses stored in the database.
It also includes significant enhancements to the Wallet User module, such as improved badge assignment, clearer visibility of KYC and Compliance statuses, and automatic updates to Account and KYC statuses when badge changes occur in denial scenarios.
Key Features
Role-Based Access Control (RBAC)
- Enhanced API Security: Introduces more granular roles for platform administrators along with the introduction of Access-tokens to improve API security.
- User Session Management: Limits unauthorized access to the console, enhancing security.
- User Password Reset: Adds functionality for easier user management.
New Customer Full Details API
- This new API provides 360-degree data on users, including currently assigned identification badges, information badges, and financial badges, along with a history of badge updates. This enhancement ensures a more intuitive user experience and verifies that customers have the intended badges and financial tiers.
Improvements in Customer Onboarding and Customer Update API
- Easier Badge Identification: Improved API responses make it easier to identify assigned badges without the need for string parsing.
- Consistent Error Messages: Addresses inconsistencies in error messages related to response keys.
Node Version Changes
- Version Update: We have upgraded the
ul-microservicesfrom Node.js Version 18.x to Node.js Version 22.x, enhancing performance and security features.
Other Enhancements and Bug Fixes
- Enhancements in User's KYC status, account status, and badge assessment.
- Fixed an issue with the proof of address information badge.
- Resolved namespace generation code breakage.
- Fixed an issue where phone search returned multiple customers.
- The Update API is now also capable of updating the customer's address.
- Encryption of Oscilar logs data stored in the database has been implemented.
Upgrade Notes
The sequence of steps to follow to upgrade are:
- Pre-requisites
- RBAC - Keycloak configration
- Container images and configmaps
- DB migrations
- Swagger APIs
- Role and User Management
Pre-requisites
- At least one console user must be assigned the
TENANT_ADMINrole under the USBC tenant. - At least one console user must be assigned the
UL_ADMINrole under the Platform Operator tenant. - Ensure you have login credentials for the above users with their respective roles.
Why is this important?
UL_ADMINandTENANT_ADMINare the two default roles seeded with full permissions and appropriate access levels.- These roles serve as the foundation for managing permissions across the system.
- You can create additional roles as needed or modify permissions on existing ones after the initial setup.
RBAC - Keycloak configuration
We’ve made updates to the Keycloak configuration related to session management. The revised settings are documented in this updated guide.
As prerequirements you should have privileges to edit the respective realm, failing to have such permissions will not be able to proceed with changes.
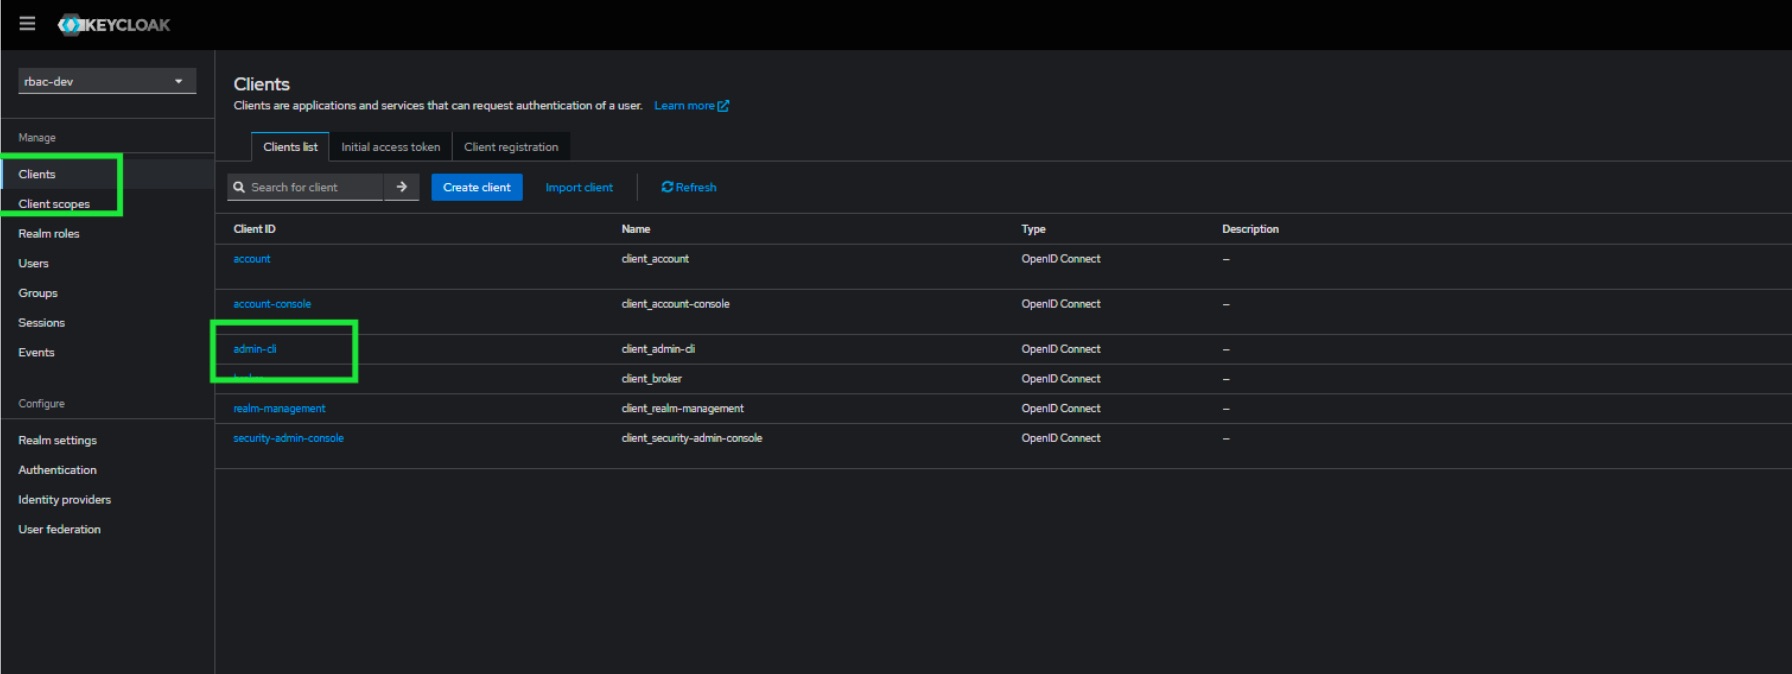
- Login to Keycloak console and navigate to top left corner to select your realm.
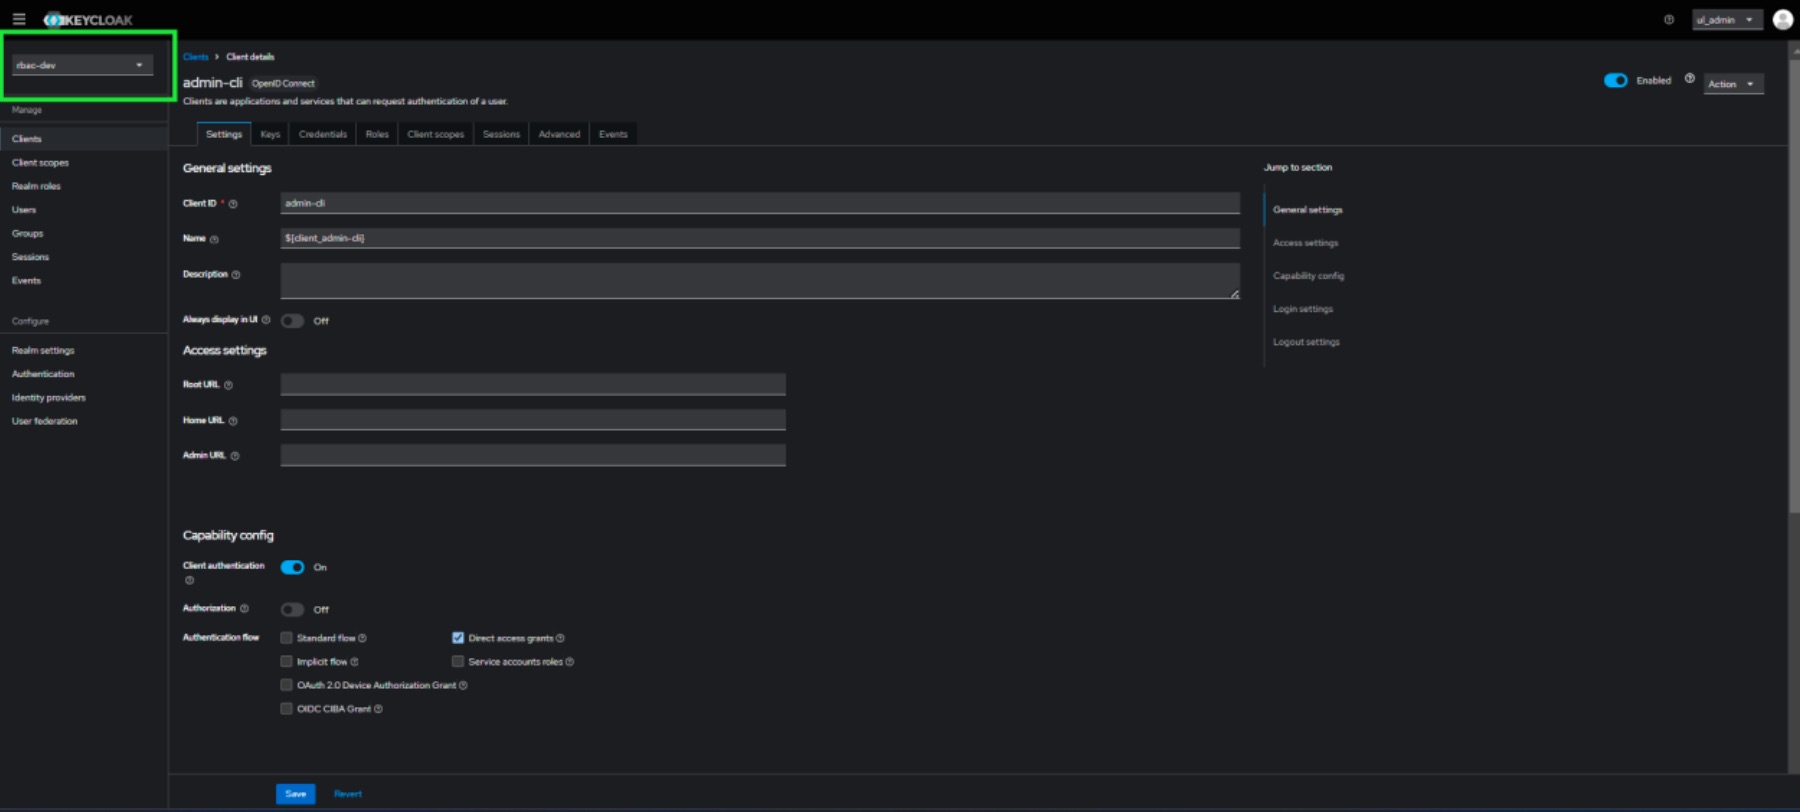
- Navigate to "Clients" and your client.
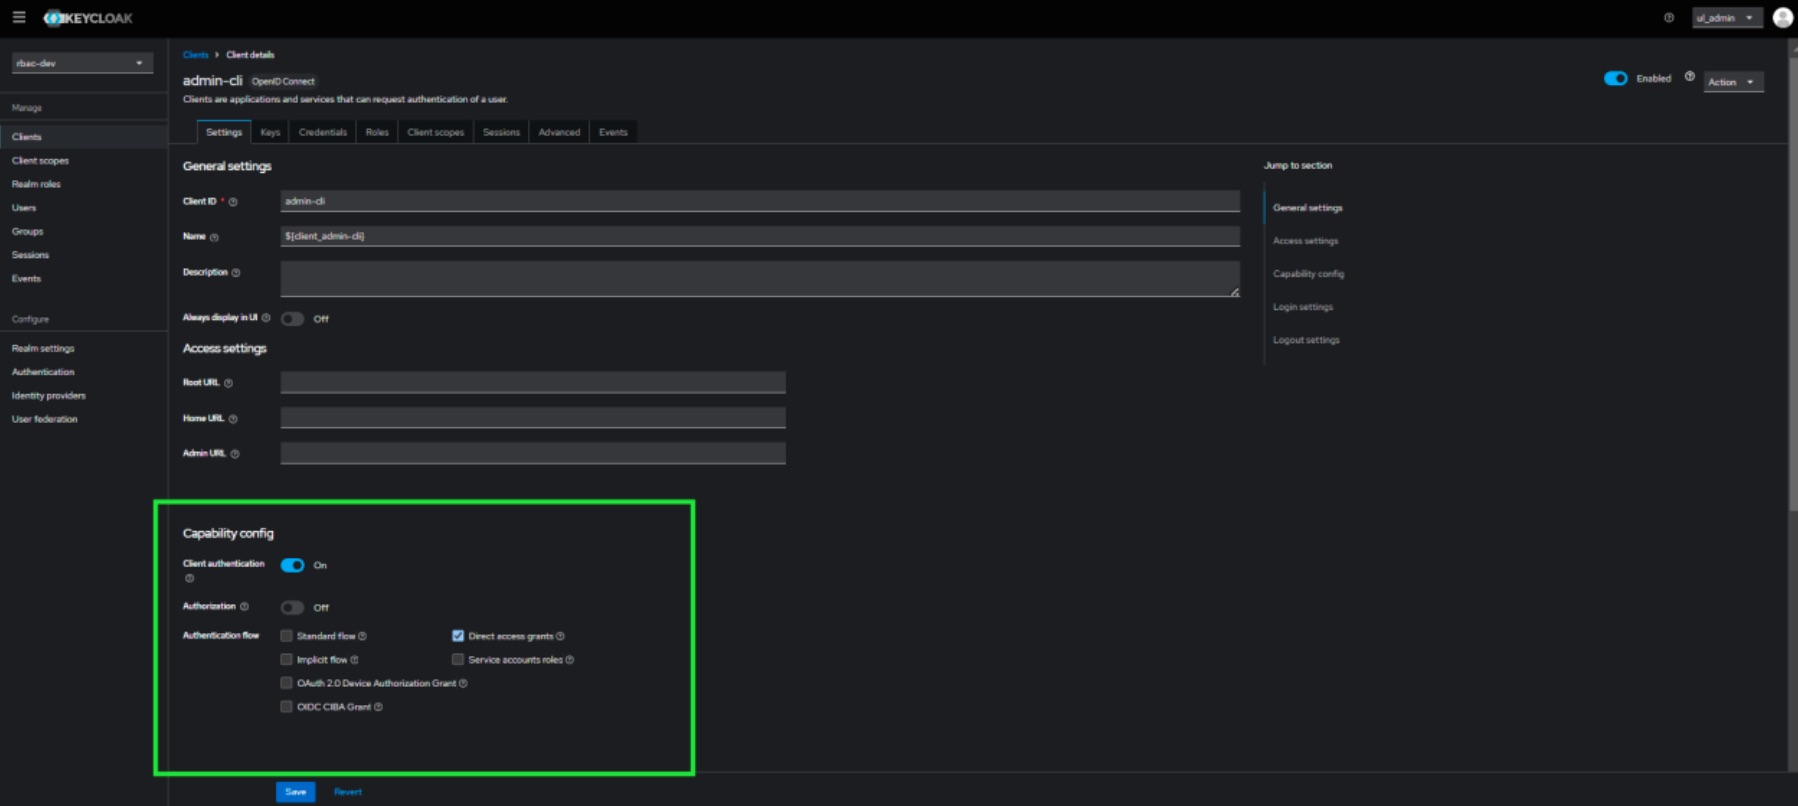
- Within "Capability config", enable client authentication with shown checkboxes and save.
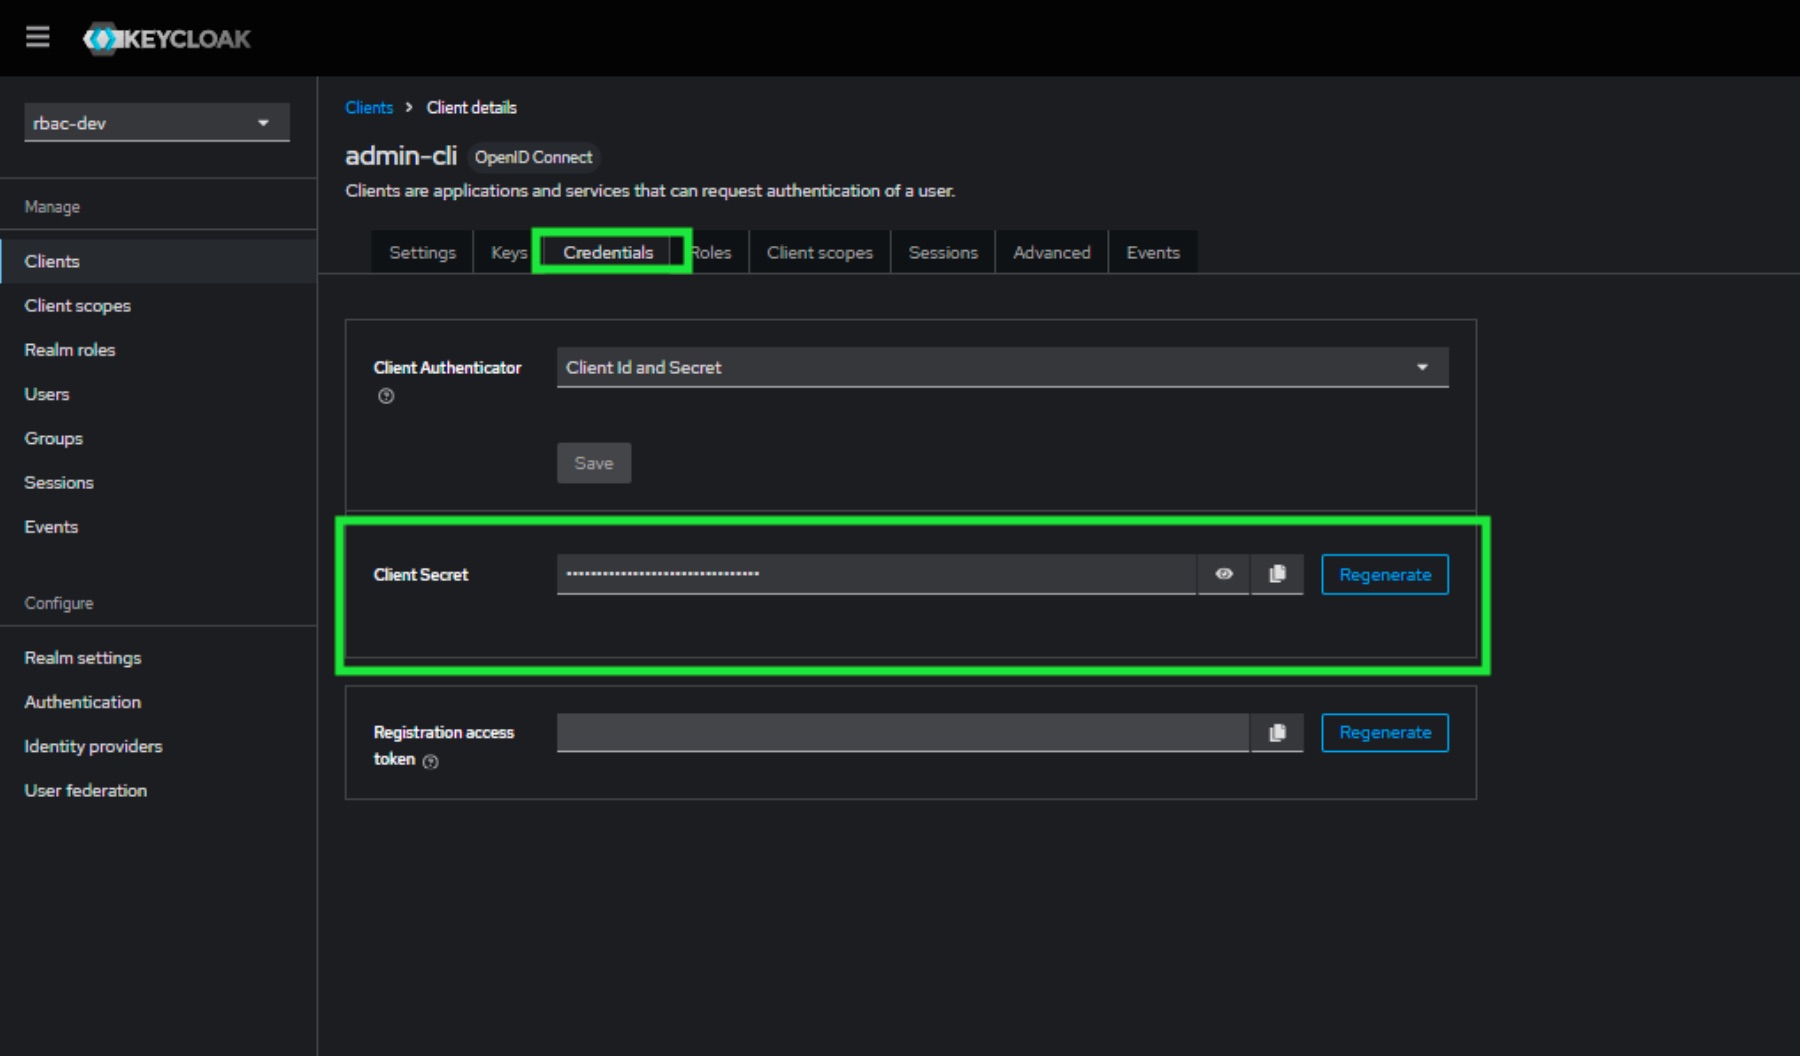
- Navigate to "Credentials" tab which will appear after and copy "Client Secret" value to later add to auth microservice variables (
KEYCLOAK_CLIENT_SECRET).
- Navigate to "Client Scopes" and email.
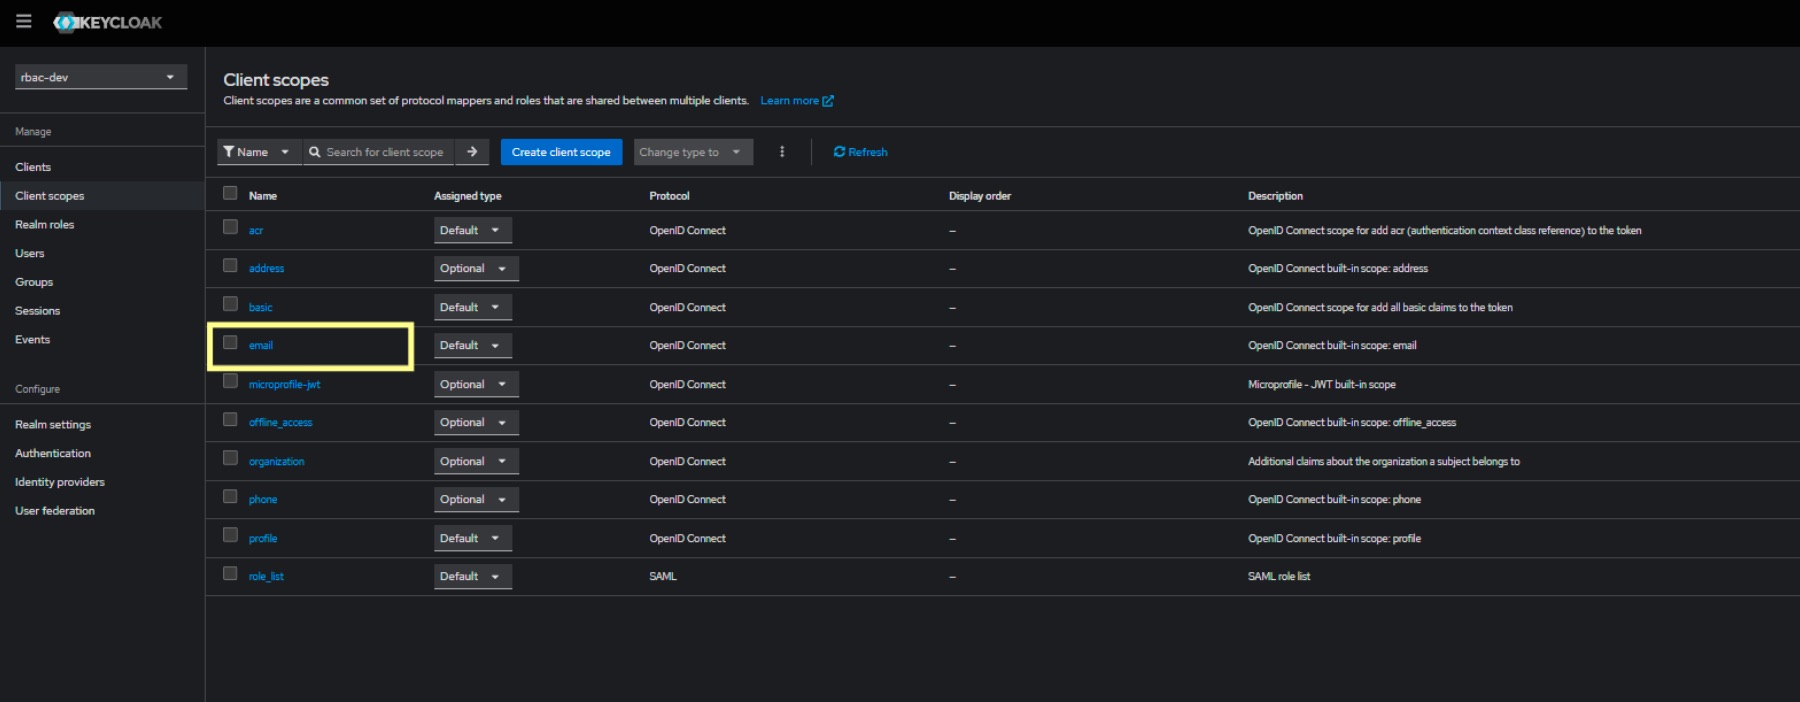
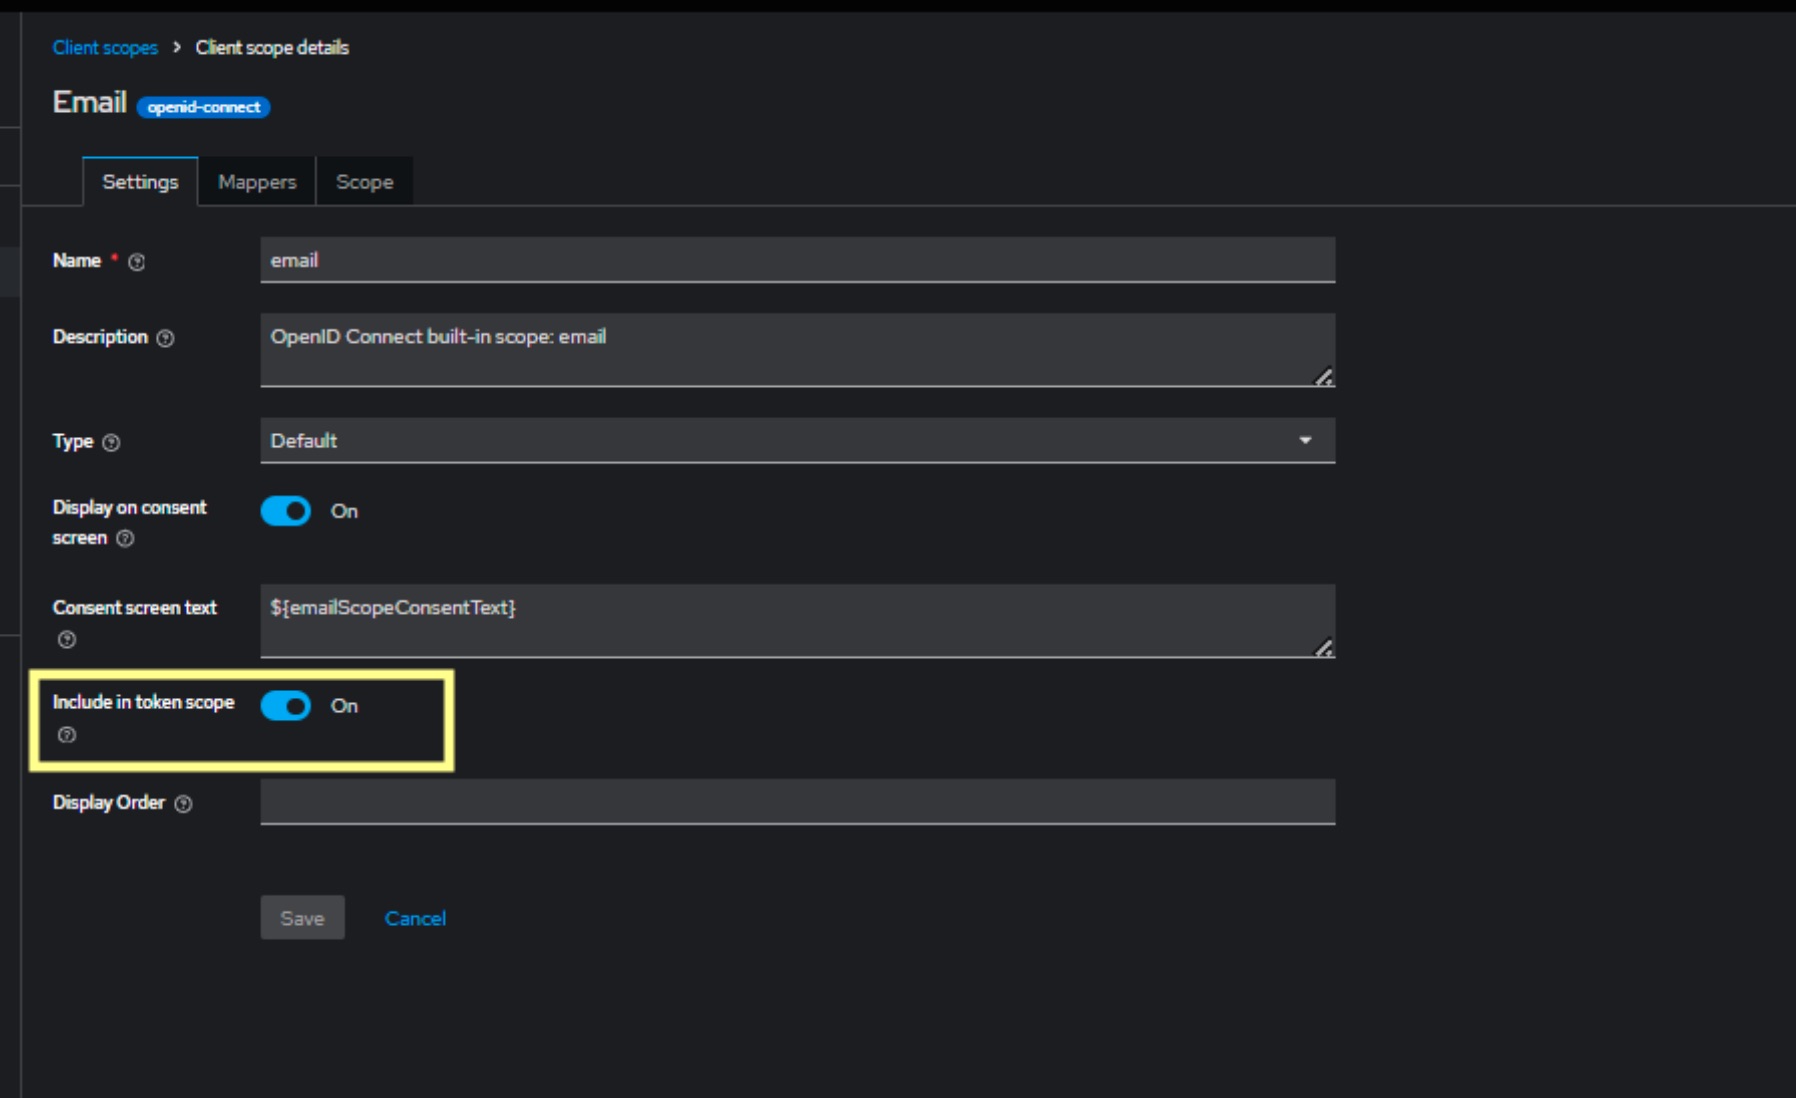
- Enable the "Include in token scope".
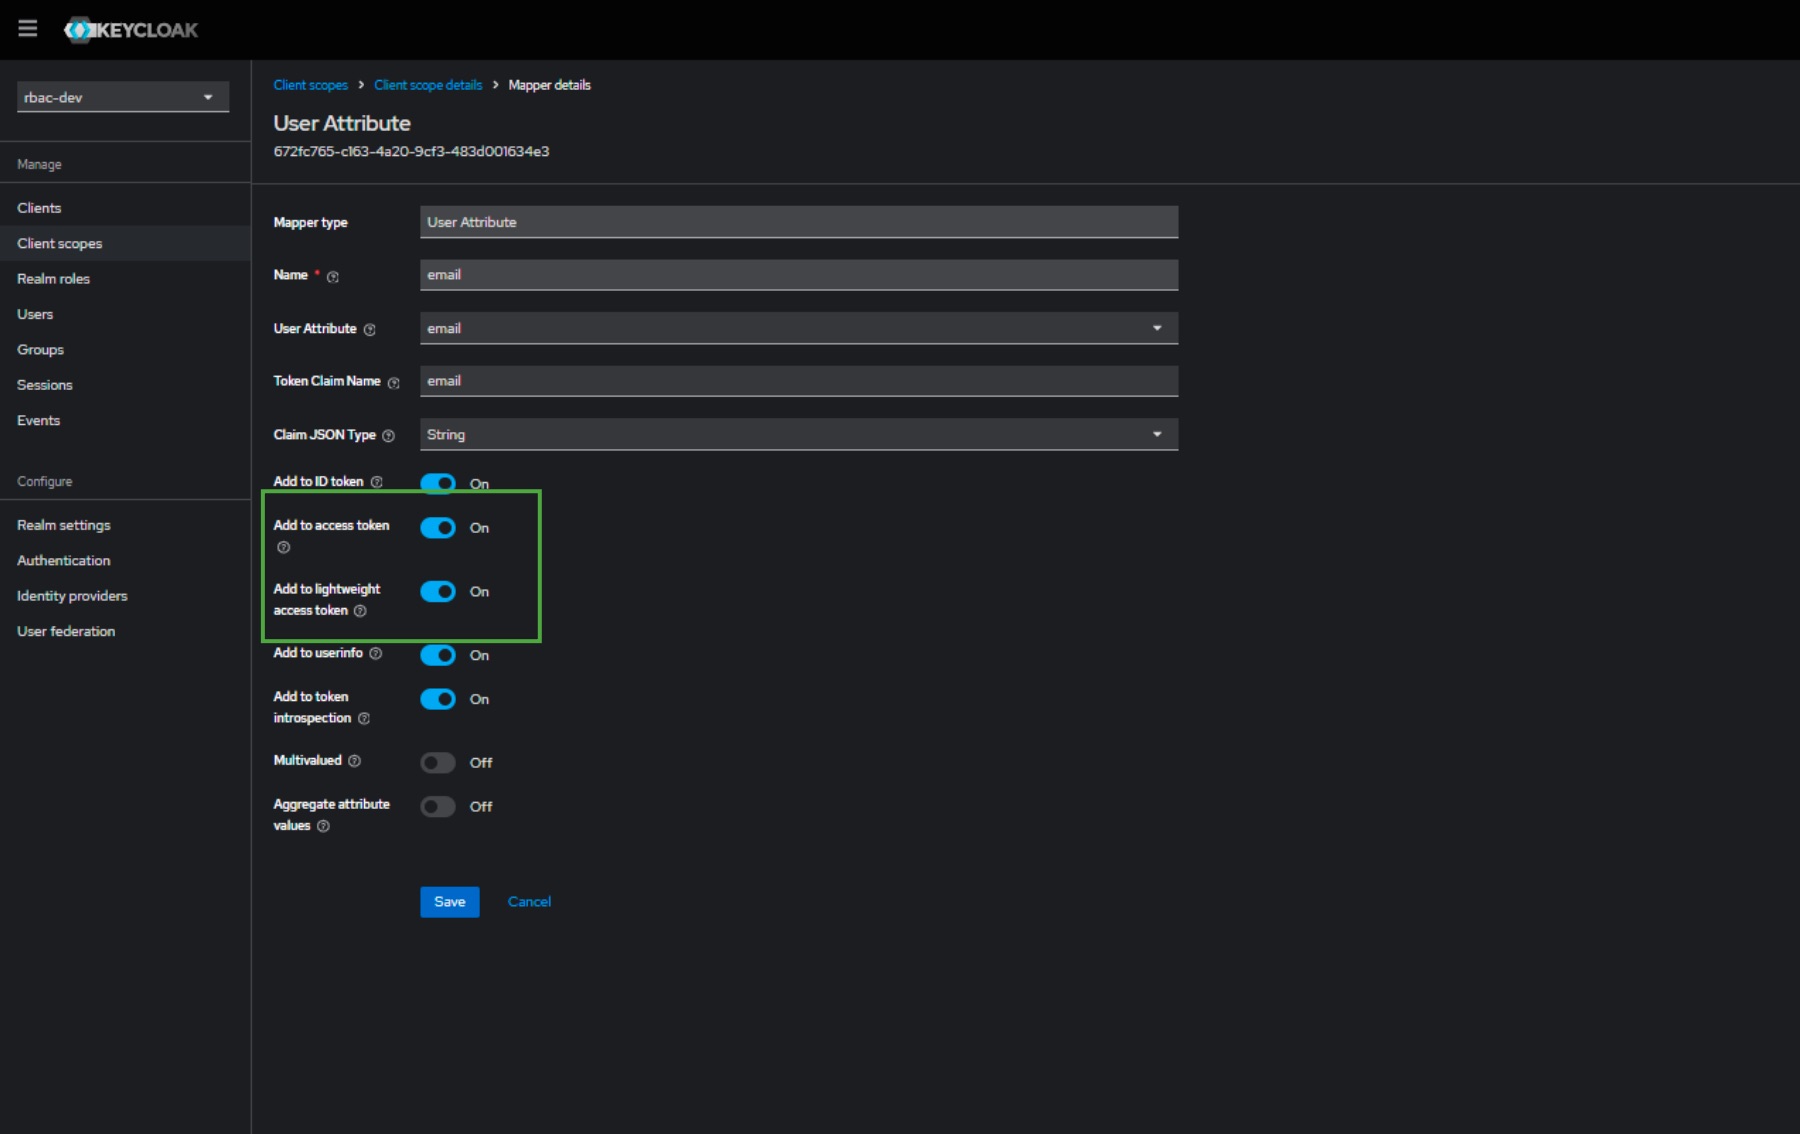
- Navigate to "Mappers" and ensure you have email mapped if not, click "Add mapper" to add email.
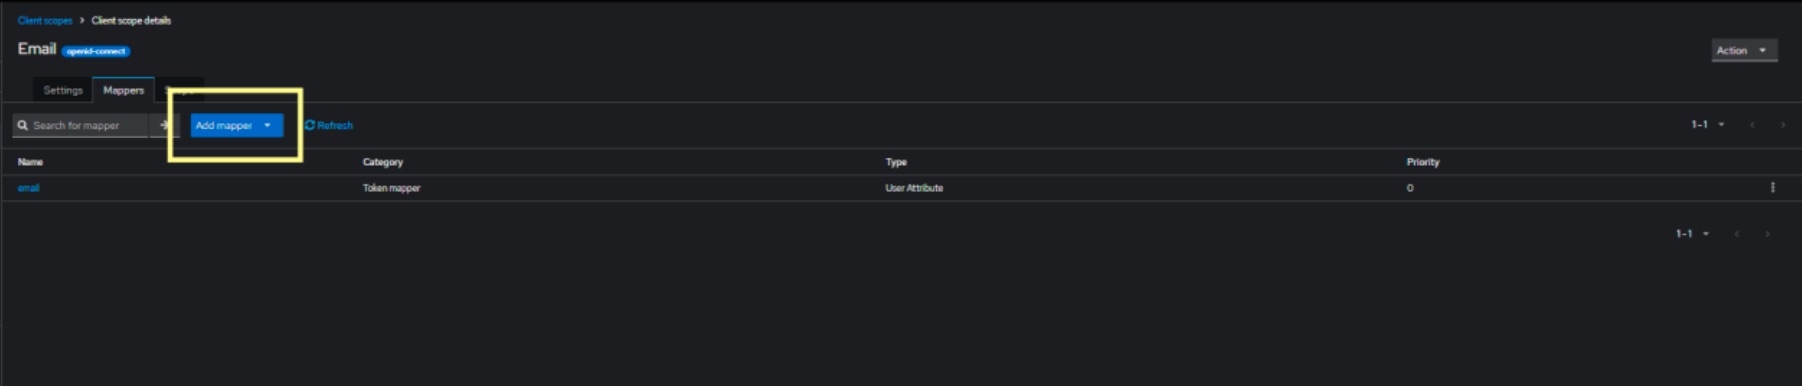
- Click on "email" row, listed previous picture, and you will be redirected to below screen. Ensure all toggle buttons given below and Save.
- Navigate to "Clients", "Clients list" tab and select "admin-cli".
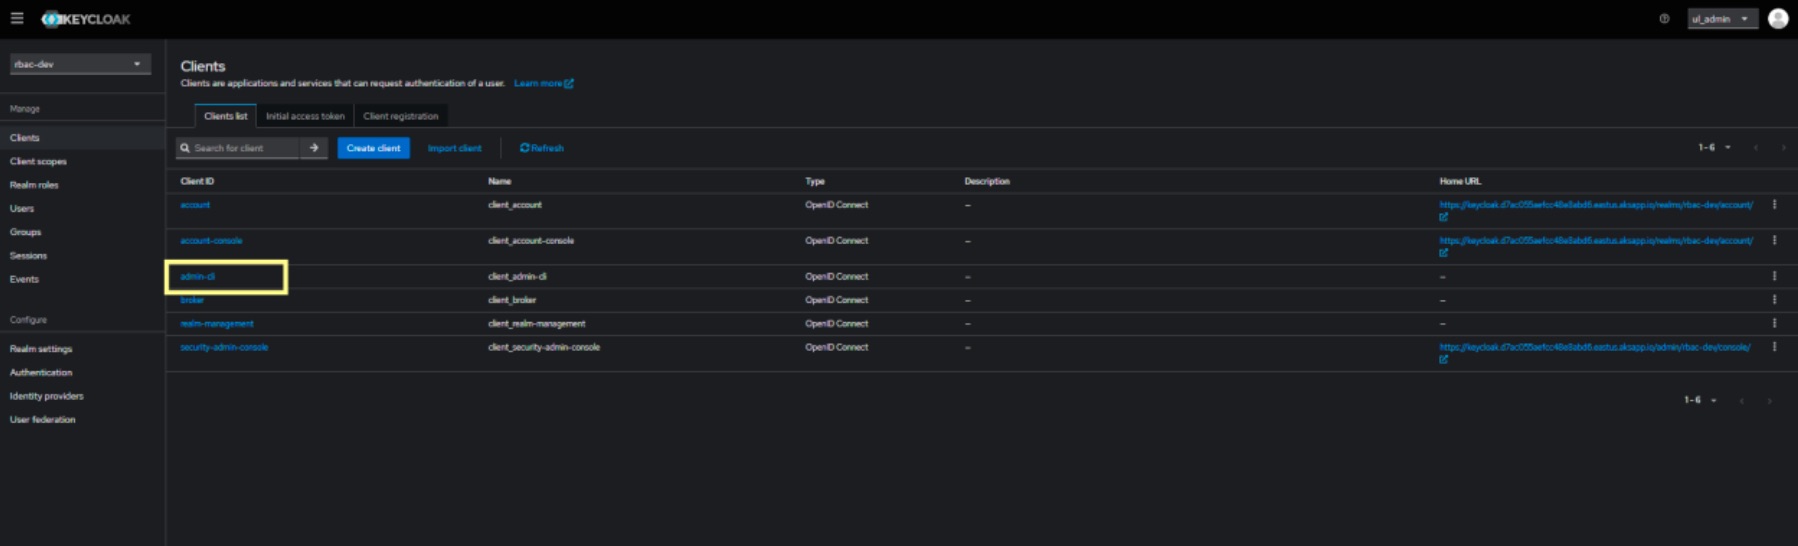
- Select "Client Scopes" tab and confirm that "email" it's listed.
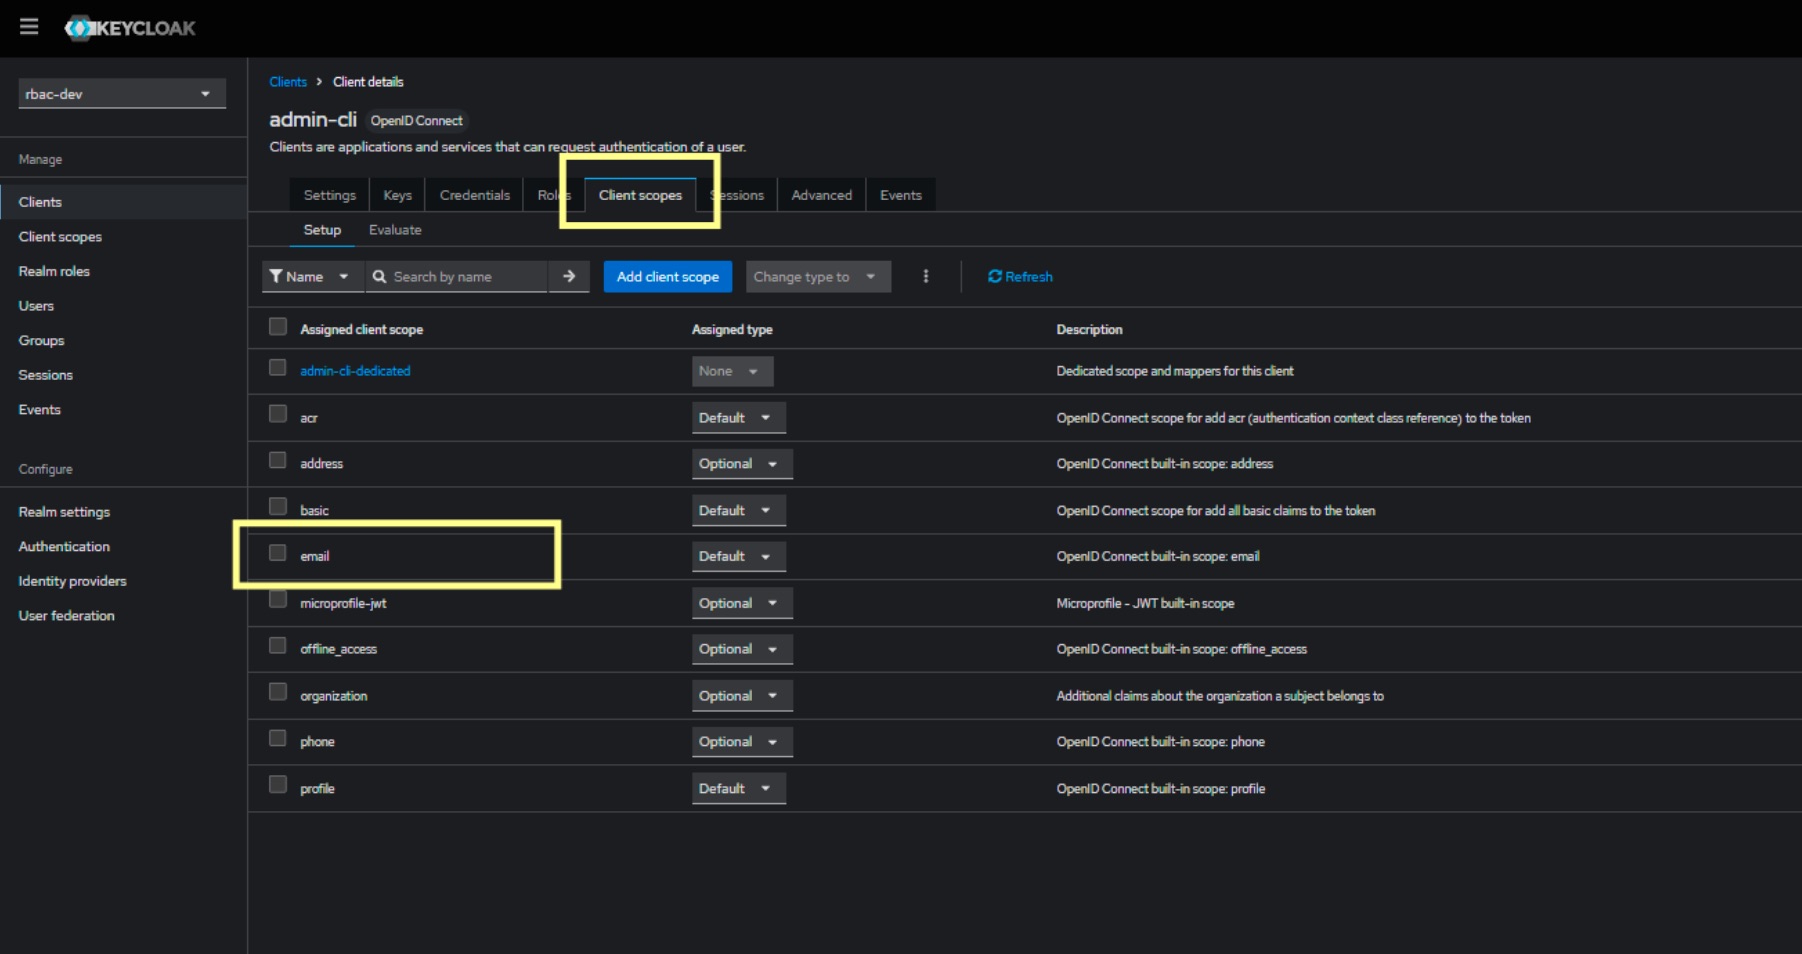
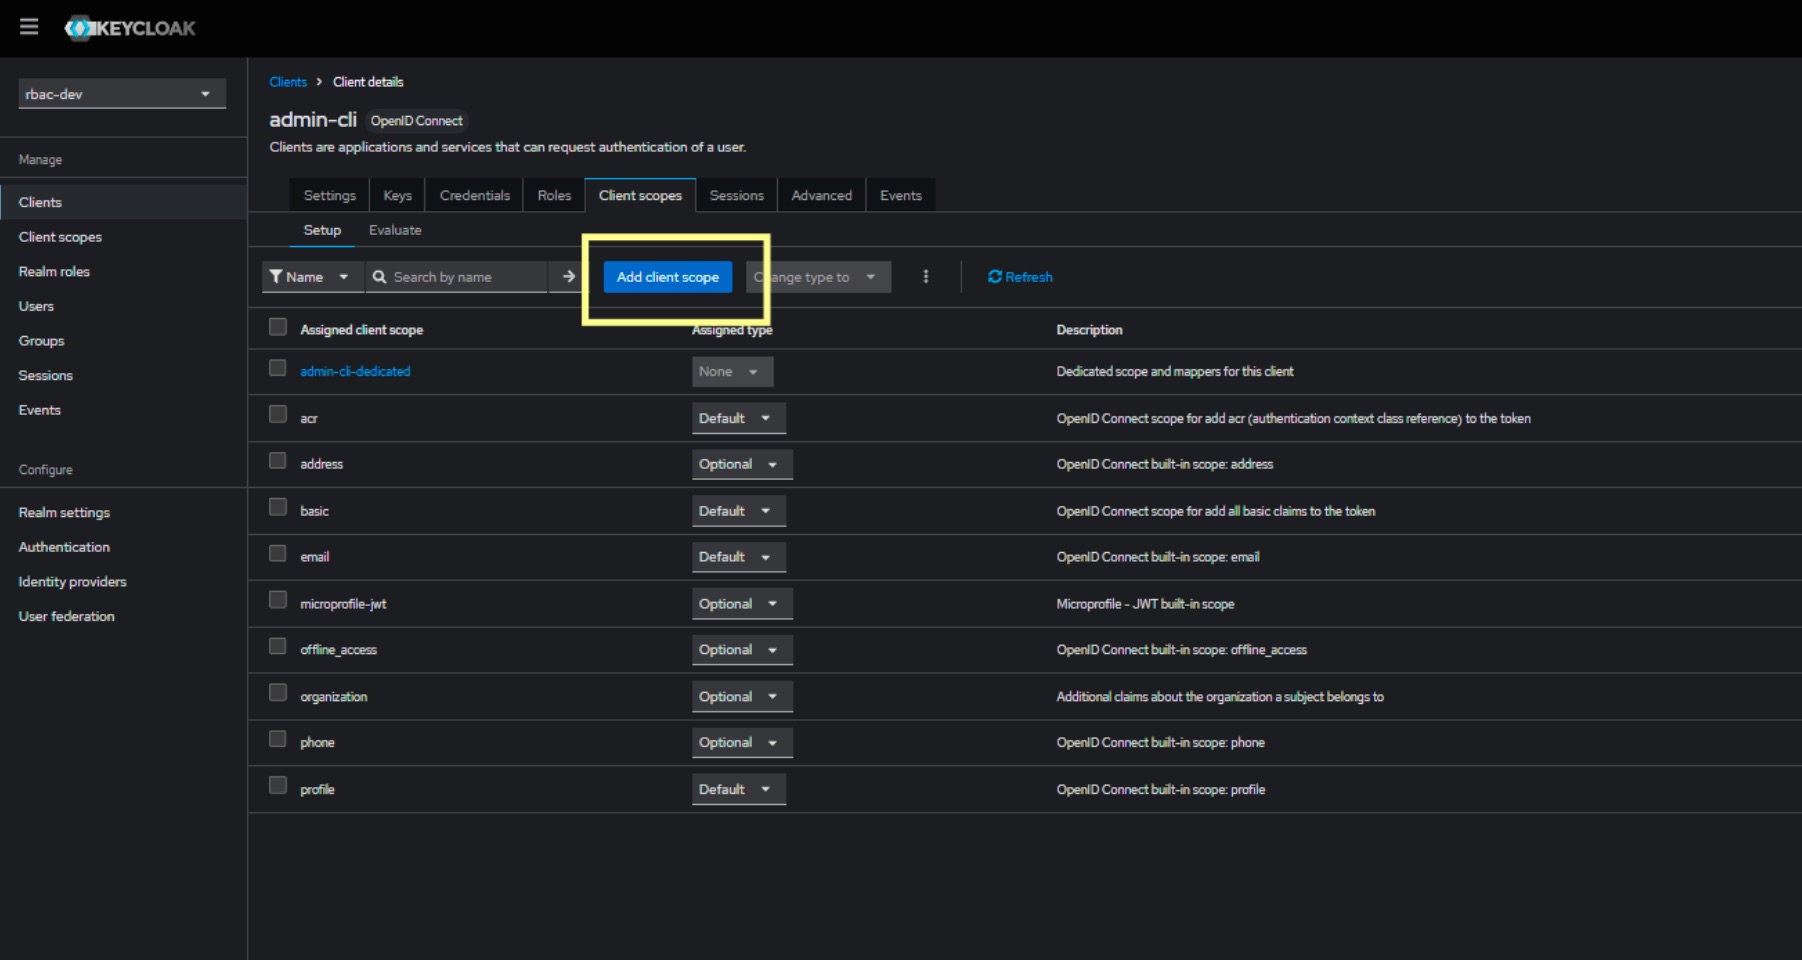
- If "email" it's not present, add the same using "Add client scope" available button.
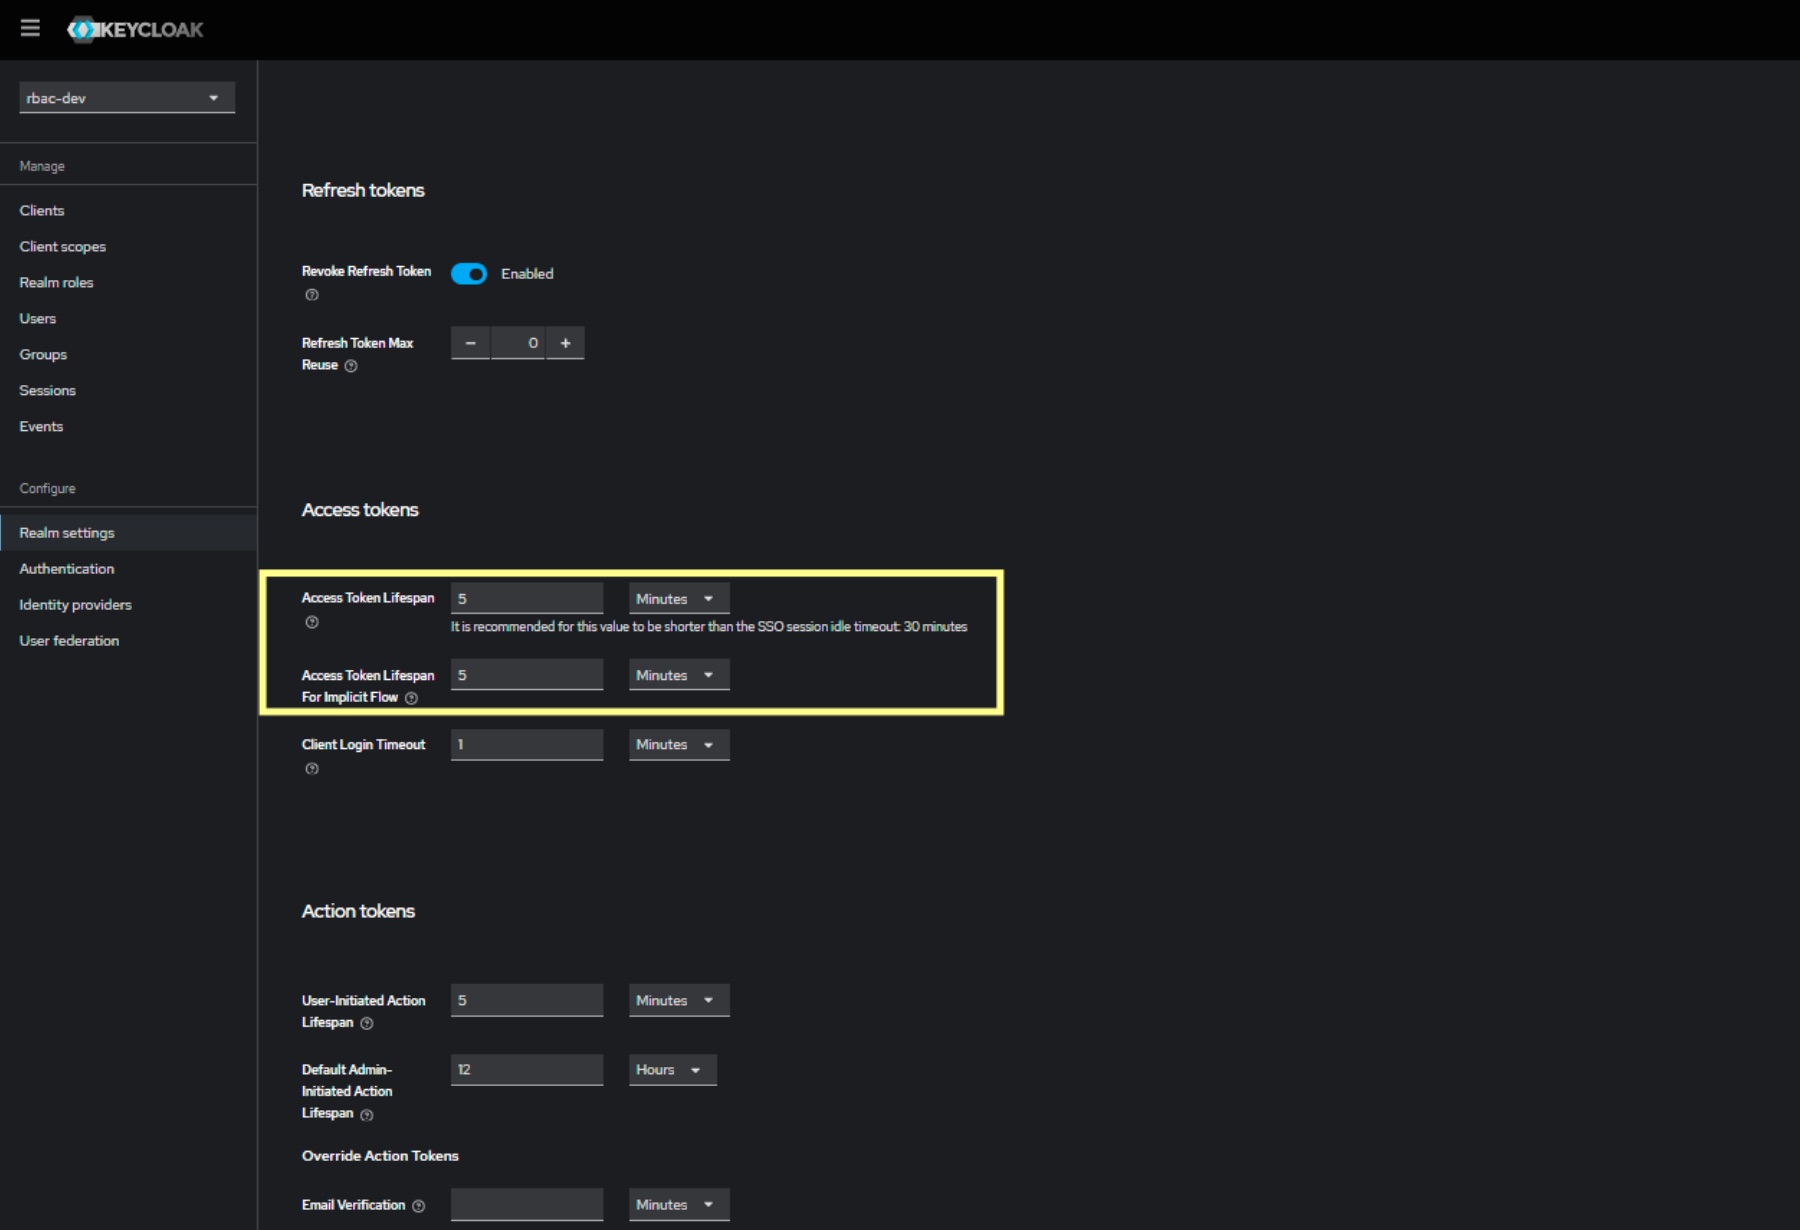
- Navigate to "Realm settings" and then to "Tokens" tab, ensure "Default Signature Algorithm" is selected correctly (
RS256) and in "Refresh tokens" configure token settings.
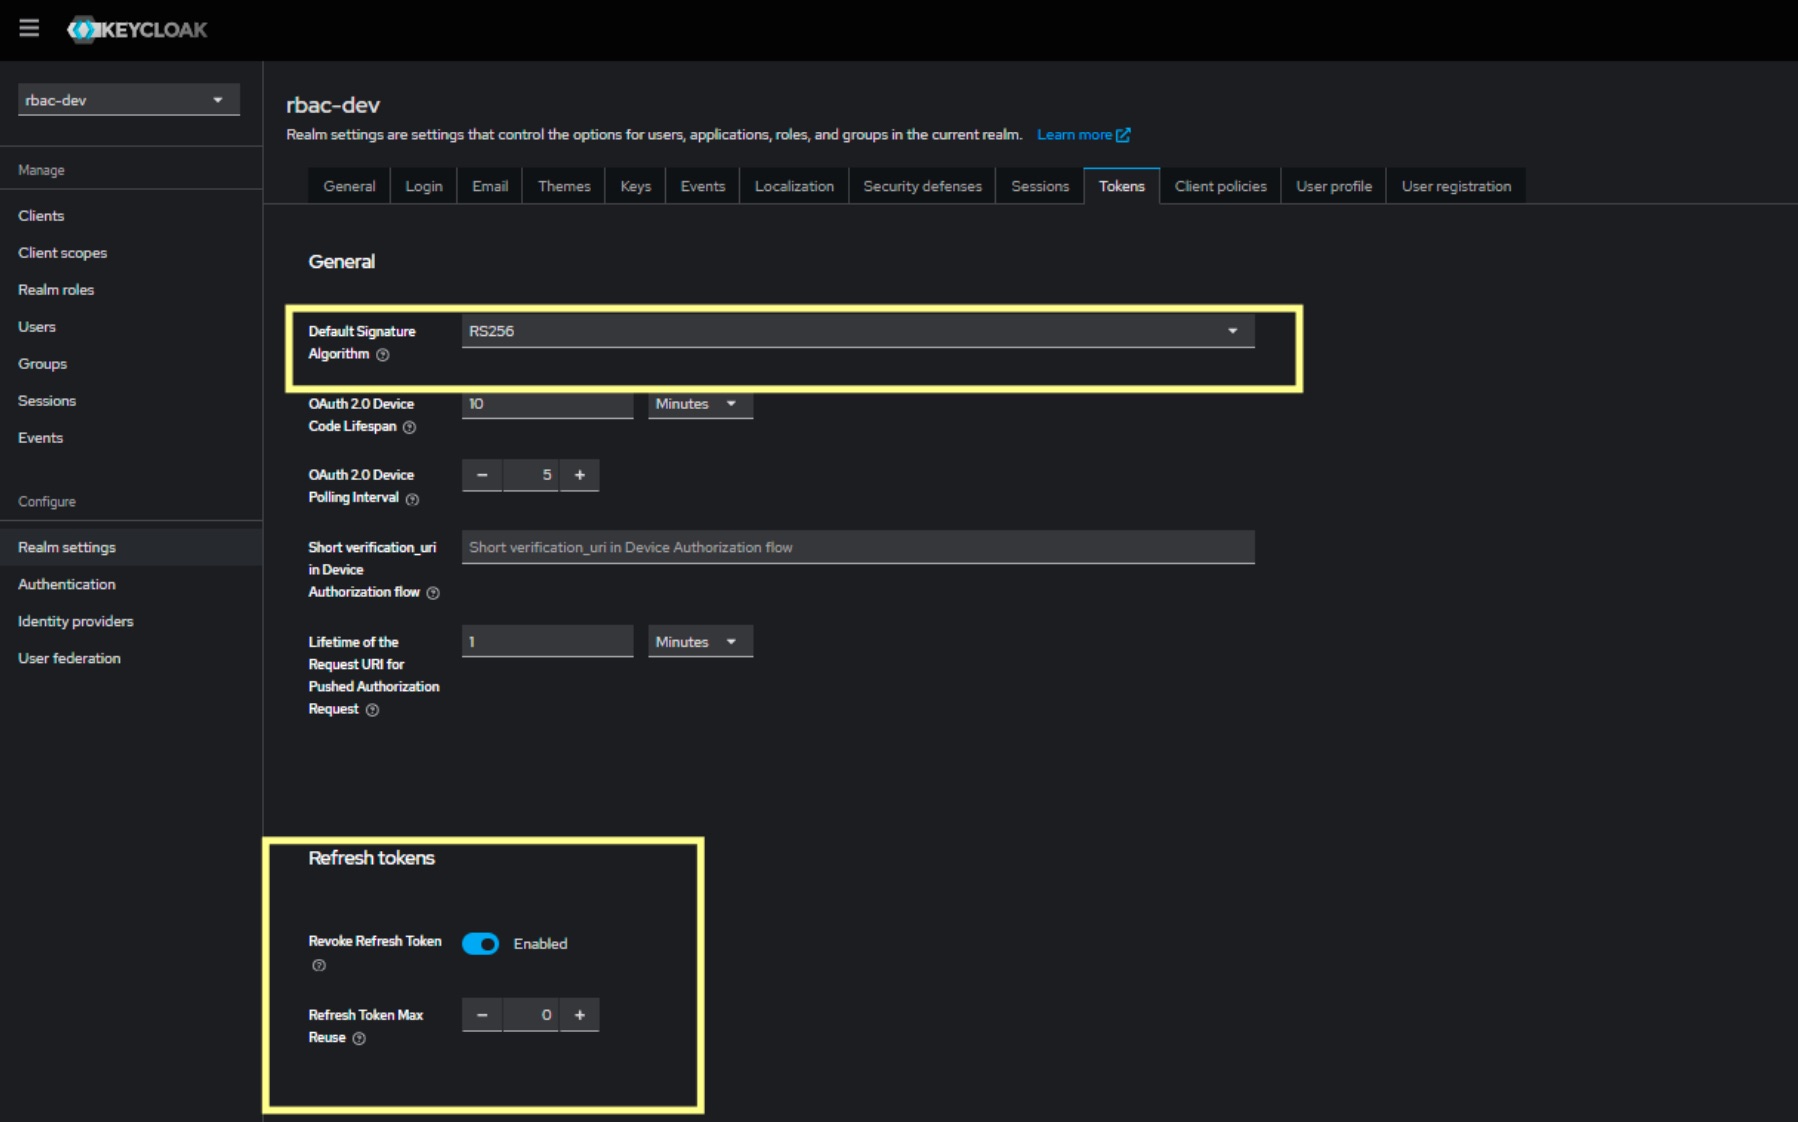
- Scroll down and configure the "Access Token Lifespan", suggested is 15 minutes.
Container images and configmaps
All provided images, available in the Image List section should be downloaded and built to be LGPL compliant.
All new images tags will be used to update Kubernetes manifests.
Core microservice
ConfigMap
Add/replace the following values in Core microservice's ConfigMap:
Info
The following service URL it's based with default settings provided in the auth microservice section.
If customized, please follow Kubernetes default patterns and adapt it to http://<service-name.namespace.svc.cluster.local>:port
Chain-Core microservice
ConfigMap
Add/replace the following values in Chain Core microservice's ConfigMap:
Info
The following service URL it's based with default settings provided in the auth microservice section.
If customized, please follow Kubernetes default patterns and adapt it to http://<service-name.namespace.svc.cluster.local>:port
Rule-Engine microservice
ConfigMap
Add/replace the following values in Rule-Engine microservice's ConfigMap:
Info
The following service URL it's based with default settings provided in the auth microservice section.
If customized, please follow Kubernetes default patterns and adapt it to http://<service-name.namespace.svc.cluster.local>:port
Reports microservice
ConfigMap
Add/replace the following values in Reports microservice's ConfigMap:
Info
The following service URL it's based with default settings provided in the auth microservice section.
If customized, please follow Kubernetes default patterns and adapt it to http://<service-name.namespace.svc.cluster.local>:port
Listener microservice
ConfigMap
Add/replace the following values in Listener microservice's ConfigMap:
Frontend microservice
ConfigMap
Add/replace the following values in Frontned ConfigMap:
Auth microservice
With this release a new service it's been deployed and must be configured.
Initial setup
To setup the new microservice there is the need to create a set of private and public key per RESET_TOKEN and M2M group.
| Variable | Description |
|---|---|
RESET_TOKEN_PRIVATE_KEY |
Private key used for signing reset password JWT tokens |
RESET_TOKEN_PUBLIC_KEY |
Public key used for verifying reset password JWT tokens. |
M2M_PRIVATE_KEY |
Private key used for signing M2M JWT tokens. |
M2M_PUBLIC_KEY |
Public key used for verifying M2M JWT tokens. |
Execute the following command and take note of the value:
Private and pub keys
The output will render both private an public to the stdout.
You should select each block and fill in the correct variable with the respective content.
Execute the above command twice, the rendered contents will be respective used between RESET_TOKEN and M2M group.
Add/replace the following values in Auth microservice's ConfigMap:
Kubernetes
Review
The following files are meant to be edited and adapted accordingly to your Kubernetes environment.
Namespace
Deployment
apiVersion: apps/v1
kind: Deployment
metadata:
  name: auth
  namespace: auth
spec:
  replicas: 1
  selector:
    matchLabels:
      app: auth
  template:
    metadata:
      labels:
        app: auth
    spec:
      containers:
      - name: auth
        image: omnumi.azurecr.io/omnumi-auth:latest
        imagePullPolicy: Always
        ports:
        - containerPort: 3002
        envFrom:
        - configMapRef:
            name: auth-configmap
Service
apiVersion: v1
kind: Service
metadata:
  name: auth
  namespace: auth
spec:
  type: ClusterIP
  ports:
  - port: 3002
  selector:
    app: auth
Configmap
Multiline
RESET_TOKEN and M2M group keys can be added as YAML multiline using |.
Check the indentation to avoid any errors
apiVersion: v1
kind: ConfigMap
metadata:
  name: auth-configmap
  namespace: auth
data:
  DB_HOST: '[replace with database host]'
  DB_USER: '[replace with database user]'
  DB_PWD: '[replace with database password]'
  DB_NAME: '[replace with database name]'

  KEYCLOAK_BASE_URL: '[replace with keycloak url]'
  KEYCLOAK_GRANT_TYPE: 'password'
  KEYCLOAK_CLIENT_ID: 'admin-cli'
  KEYCLOAK_USERNAME: '[replace with keycloak username]'
  KEYCLOAK_PASSWORD: '[replace with keycloak password]'
  KEYCLOAK_REALMS: '[replace with keycloak realm]'
  KEYCLOAK_CLIENT_SECRET: '[replace keycloak previously generated client secret value]'

  AZURE_TENANT_ID: '[replace with azure tenant id]'
  AZURE_CLIENT_ID: '[replace with azure client id]'
  AZURE_CLIENT_SECRET: '[replace with azure client secret]'
  AZURE_KEYVAULT_NAME: '[replace with azure keyvault name]'

  AZURE_SECRET_NAME: 'PSQLENCRYPTIONKEY'

  REDIS_PORT: '[replace with redis host port]'
  REDIS_HOST: '[replace with redis host]'
  REDIS_PASSWORD: '[replace with redis password]'

  ## '15m': Expiry in 15 minutes. '1h': Expiry in 1 hour. '1d': Expiry in 1 day. '1w': Expiry in 1 week.'1y': Expiry in 1 year.'30s': Expiry in 30 seconds.
  RESET_TOKEN_EXPIRY: '1h'
  RESET_PASSWORD_TEMPLATE: 'ResetPassword'
  RESET_PASSWORD_BASE_URL: '[replace with console url]'/resetPasswordScreen'

  LOGO_URL: '[replace with logo url]'

  RESET_TOKEN_PRIVATE_KEY: |
    '[replace with key contents]'

  RESET_TOKEN_PUBLIC_KEY: |
    '[replace with key contents]'

  DEFAULT_TENANT: 'Platform Operator'

  KAFKA_BROKER: '[replace with kafka host]'
  KAFKA_PORT: '[replace with kafka host port]'
  KAFKA_LOGGER_EVENT_TOPIC: 'KAFKA_LOGGER_EVENT_TOPIC'
  KAFKA_CLIENT_ID: 'KAFKA_LOGGER_EVENT'

  #Azure Email Cred
  AZURE_HOST: '[replace with Azure email alias]'
  CONNECTION_STRING: '[replace with Azure email connection string]'

  M2M_PRIVATE_KEY: |
    '[with key contents]'

  M2M_PUBLIC_KEY: |
    '[with key contents]'

  M2M_TOKEN_EXPIRY: '1y'
DB migrations
Download DB migrations ZIP file available in Assets, unpack/unzip it in order to perform remaining instructions.
DB backup
Before proceeding with remaining steps, it's strongly advised to take a database backup before proceeding.
Update credentials
Edit/create a file named development.env inside db-migrations/src/common/envs folder
DB_HOST=[replace with db host url]
DB_USER=[replace with db user]
DB_PWD=[replace with db user password]
DB_NAME=[replace with db name]

AZURE_TENANT_ID=[replace with azure tenant id]
AZURE_CLIENT_ID=[replace with azure client id]
AZURE_CLIENT_SECRET=[replace with azure client secret]
AZURE_KEYVAULT_NAME=[replace with azure keyvault name]
Execute DB migrations
Execute the remaining commands located inside the extracted content folder (e.g.: db-migrations):
Swagger APIs
Download Swagger APIs tarball file available in Assets, unpack/unzip it in order to perform remaining instructions.
Update API
omnumi-internal
Upload file
- Navigate to the API Management service service.
- Expand
APIsleft blade menu and selectAPIs - Select
omnumi-internaland expand the API option button (...) to selectImportavailable option - Select
OpenAPItile- Import method:
Update - Select file:
Omnumi-Internal.openapi+json.json
- Import method:
Update settings
After a successful import update the following fields:
- Select
omnumi-internalAPI again - Open
Settingstab and updateWeb service URLwithul-coremicroservice URL - Save the changes
Update methods chain-core
- Select
omnumi-internalAPI again - Open
Designtab and enableGroup by tag - On the list expand
ChainCoreand update theBackend - HTTP(s) endpointwithul-chain-coremicroservice URL - Repeat operation for all listed API methods on the
ChainCore
omnumi
Upload file
- Navigate to the API Management service service.
- Expand
APIsleft blade menu and selectAPIs - Select
omnumiand expand the API option button (...) to selectImportavailable option - Select
OpenAPItile- Import method:
Update - Select file:
Omnumi External.openapi+json.json
- Import method:
Update settings
- Select
omnumiAPI again - Open
Settingstab and updateWeb service URLwithul-coremicroservice URL - Save the changes
Update methods chain-core
- Select
omnumiAPI again - Open
Designtab and enableGroup by tag - On the list expand
ChainCoreand update theBackend - HTTP(s) endpointwithul-chain-coremicroservice URL - Repeat operation for all listed API methods on the
ChainCore
Rule-Engine
Upload file
- Navigate to the API Management service service.
- Expand
APIsleft blade menu and selectAPIs - Select
Omnumi-rule-engineand expand the API option button (...) to selectImportavailable option - Select
OpenAPItile- Import method:
Update - Select file:
Omnumi Rule engine.openapi+json.json
- Import method:
Update settings
- Select
omnumiAPI again - Open
Settingstab and updateWeb service URLwithul-rule-enginemicroservice URL - Save the changes
Reports
Upload file
- Navigate to the API Management service service.
- Expand
APIsleft blade menu and selectAPIs - Select
Omnumi-rule-engineand expand the API option button (...) to selectImportavailable option - Select
OpenAPItile- Import method:
Update - Select file:
Omnumi reports.openapi+json.json
- Import method:
Update settings
- Select
omnumiAPI again - Open
Settingstab and updateWeb service URLwithul-reportsmicroservice URL - Save the changes
Auth
Upload file
- Navigate to the API Management service service.
- Expand
APIsleft blade menu and selectAPIs - Click on
Add Apiand selectImportavailable option - Select
OpenAPItile- Select file:
Omnumi Auth Service.openapi+json.json
- Select file:
Update settings
- Select
omnumiAPI again - Open
Settingstab and updateWeb service URLwithul-authmicroservice URL - Save the changes
Role and User Management
Create role
- Login to the portal using your credentials.

- Navigate to "Roles & Access Management", "Role management" Tab.
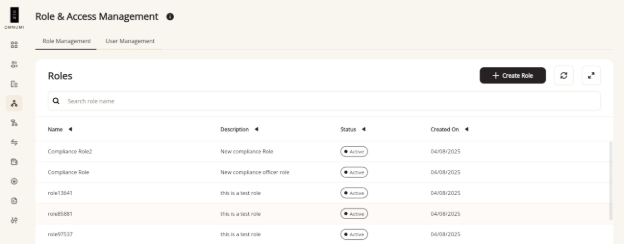
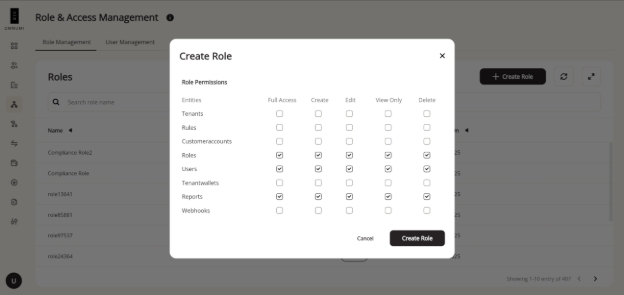
- Click on "Create Role" button. Choose "Access Level" Tenant.
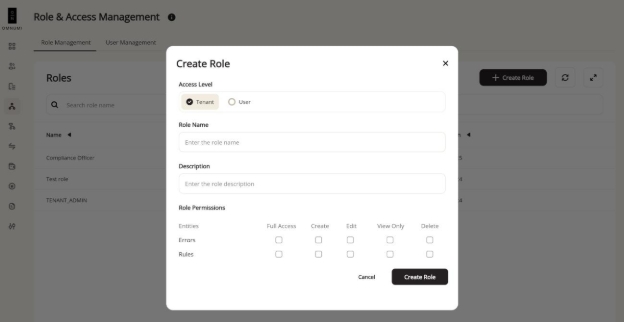
- Fill "Role Name", "Description" and related level of entity access along with proper "Create" / "Edit" / "View" / "Delete" access. Submit through “Create Role”.
- Navigate to "User Management" tab and click on “Create User”.
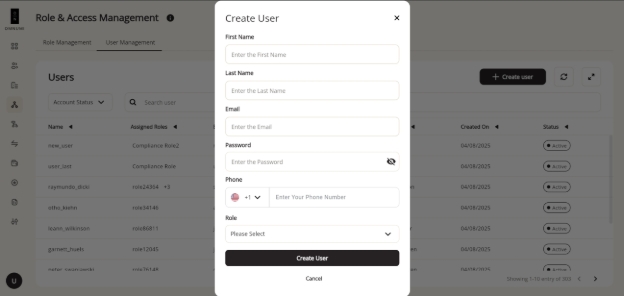
- Fill all details to create a new user.
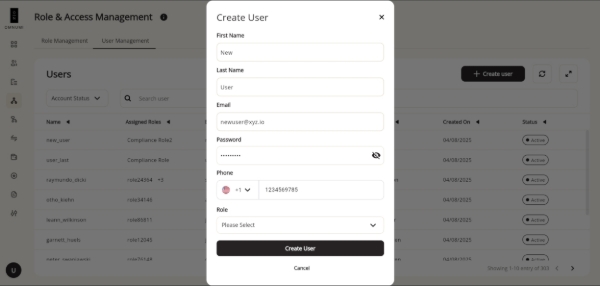
- Select the role you want to assign to the user.
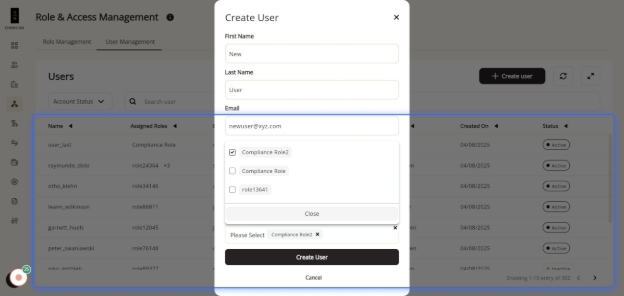
- Click on “Create User”.
Update existing role
- Click on role you want to update.
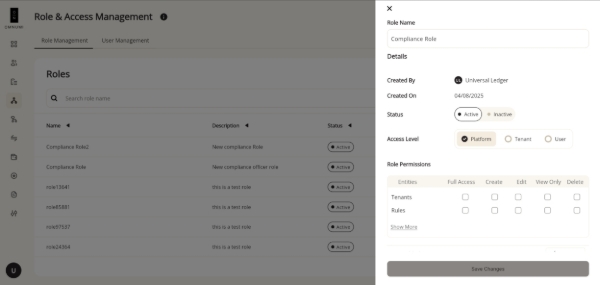
- Update the details you want to change.
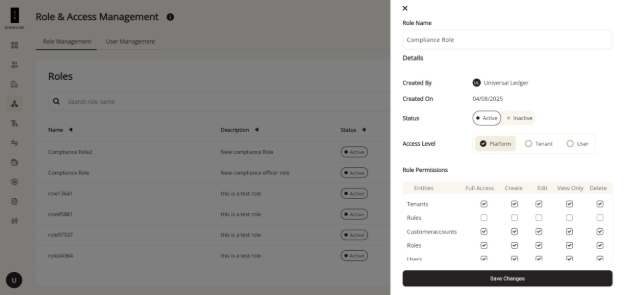
- Click on “Save Changes”.
Image list
| Microservice name | Image tag |
|---|---|
| Core Microservice | omnumisandbox.azurecr.io/core:2.7.0-deliverable |
| Listener Microservice | omnumisandbox.azurecr.io/listener:2.7.0-deliverable |
| Chain-core Microservice | omnumisandbox.azurecr.io/chain-core:2.7.0-deliverable |
| Reports Microservice | omnumisandbox.azurecr.io/report:2.7.0-deliverable |
| Rule-Engine Microservice | omnumisandbox.azurecr.io/rule-engine:2.7.0-deliverable |
| Frontend Microservice | omnumisandbox.azurecr.io/frontend:2.7.0 |
| Auth Microservice | omnumisandbox.azurecr.io/ul-auth:1.0.0-deliverable |